
Guide to Fitting Options and 5 Simple Steps to Installation
Installing new fittings on a water tank is not a difficult process. In fact, it only requires a few basic tools and the know-how. In this Poly Tanks Series, we will show you 5 easy steps on how to install fittings on a water tank. Tank fittings themselves provide much of the means for installation, and water tanks – here meaning plastic, polyethylene tanks – are not difficult or a difficult material to work with.
While this guide specifies water tanks, the methods provided can be used for all polyethylene tanks regardless of the type or the resource they store. If looking to learn how to install fittings on your poly tank quickly and with a leak-tight connection, we provide the details in five (5) simple steps.
First, Some Details on Fittings:
Water tank fittings are also known as bulkheads, bulkhead fittings, and through-wall fittings. By definition, a bulkhead is a plumbing connection that passes through the wall of a sealed vessel or object to allow the flow or continued route of a liquid, gas, or other component such as wiring.
Bulkhead fittings for plastic tanks come in a variety of materials that include PVC, CPVC, PE, PP and stainless steel. These abbreviations stand for polyvinyl chloride (PVC), chlorinated polyvinyl chloride (CPVC), polyethylene (PE), and polypropylene (PP).
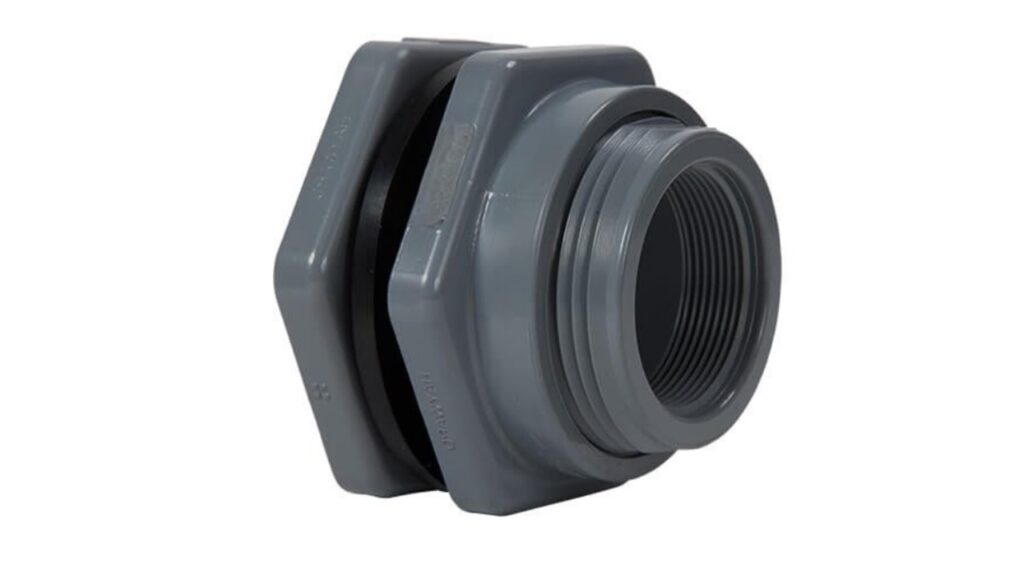
They come in different styles and sizes as well. Bulkhead styles include threaded, bolted, self aligning, and garden hose adapter. Frequent sizes include ½”, ¾”, 1”, 1-¼”, 1-½”, 2”, 3”, and 4”. Most are threaded in National Pipe Thread (NPT) style for union to other NPT plumbing. These options allow fittings to be matched to desired specifications based on work conditions and equipment. Collectively, the 2” threaded polypropylene bulkhead fitting is the most common.
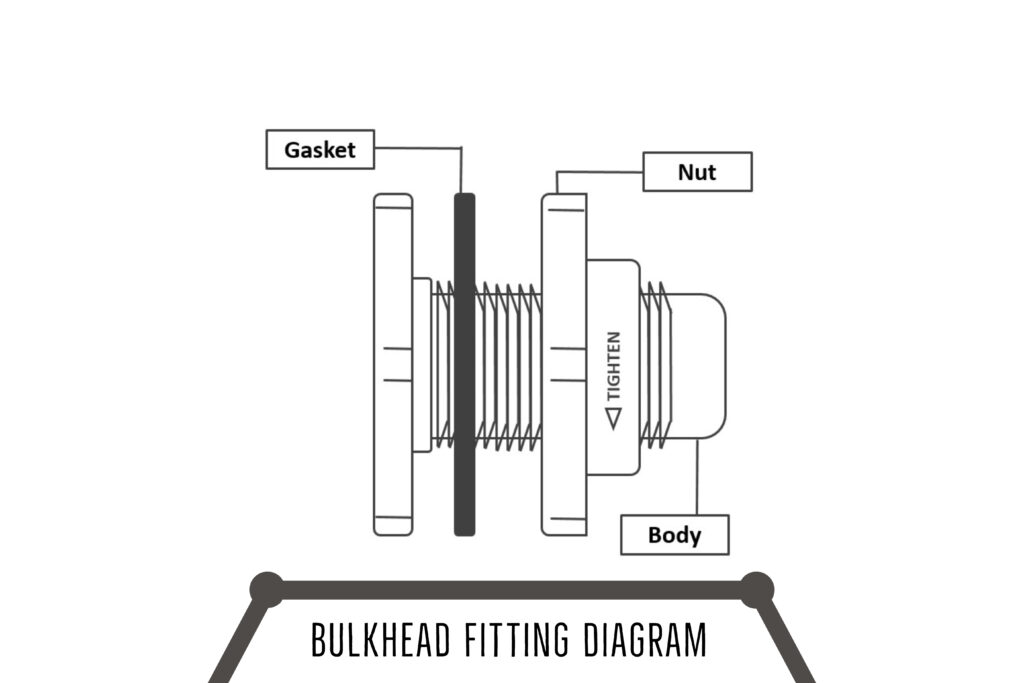
A bulkhead fitting is essentially made of three parts: the body, the gasket, and the locknut. The body is the main part of the through-wall fitting, the gasket is used to ensure a leak-proof seal, and the locknut tightens the whole fitting together and keeps it secure in place. Bolted bulkhead fitting parts include: the back plate with body, the gasket, the front plate, and bolts.
Installing Poly Tank Fittings in 5 Steps
Step One: Prepare Tank & Mark Location
First, prepare the poly tank to install the fitting. Drain the tank of any contents to empty or to a level that is beneath the location for the new fitting. Also, if this is a new tank, it’s best to ensure it has been properly placed and installed accordingly.
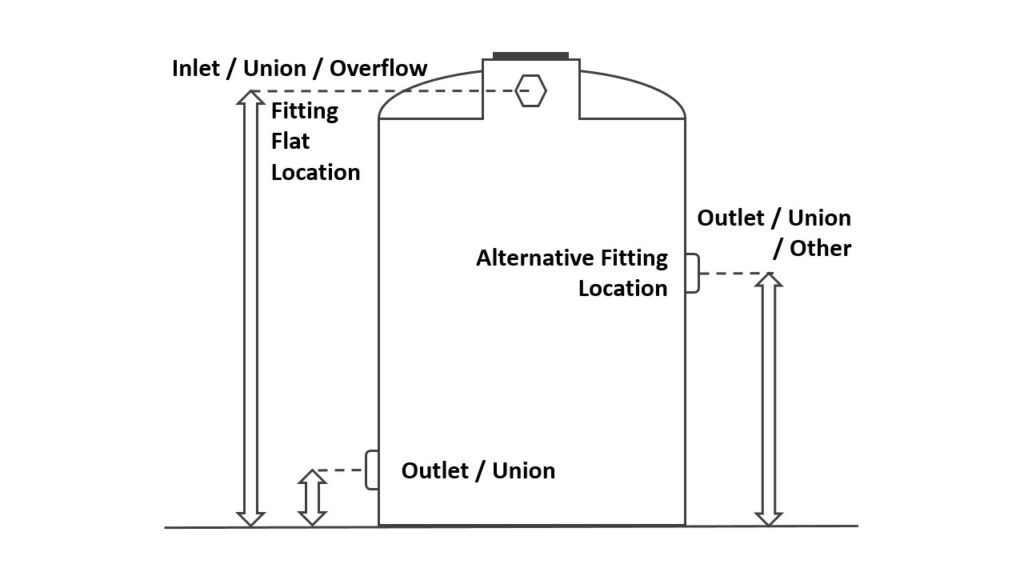
Next, use a permanent marker or some other means to mark the location where the fitting will be installed. Many cylindrical poly water tanks feature a somewhat flatter side every 90° turn around the circular, 360° tank. If this is so for your tank, these locations are ideal for bulkhead placement.
Many water tanks also feature intentionally-added flat spots, known as fitting flats, that provide a set location for adding bulkhead fittings.
Step Two: Cut the Tank Wall
Common woodworking tools and various others can be used to cut through polyethylene plastic to make the hole necessary to install a bulkhead. The tank wall may be up to ½” thick or more depending on the brand, quality and intended use of the tank. Note that different types of bulkhead fittings may require different size holes for installation. Standard bulkhead fittings are usually the same for the different material types, but bolted bulkheads and self-aligning bulkheads will require a different size hole to be cut.
Before cutting, know the size of the new bulkhead fitting to be installed and the size of the hole that needs to be cut. If uncertain, it is always recommended to do a practice cut on a scrap piece of wood or plastic and do a test fit with the fitting. When doing a test fit, the flat backing of the body and the gasket should cover the hole that was made for a secure seal when the locknut or bolts are in place.
Refer to the following table to know the fitting hole size to cut based on the size of the new fitting. Note, the measurements are in inches and the sizes are for standard type bulkheads.
| Bulkhead Size | Min Hole Size | Max Hole Size | Fraction Measurement |
|---|---|---|---|
| 1/2 | 1.38 | 1.41 | 1-3/8 |
| 3/4 | 1.63 | 1.66 | 1-5/8 |
| 1 | 1.87 | 1.91 | 1-7/8 |
| 1-1/4 | 2.63 | 2.67 | 2-5/8 |
| 1-1/2 | 2.63 | 2.67 | 2-5/8 |
| 2 | 3.25 | 3.28 | 3-1/4 |
| 3 | 4.50 | 4.54 | 4-1/2 |
| 4 | 5.75 | 5.78 | 5-3/4 |
| 6 | 8.00 | 8.06 | 8 |
When the cut-size of the hole is known, use a power drill and hole saw to make the circular cut. A hole saw is recommended as well as one rated for cutting plastic. A splayed bit or an auger type bit can also be used. Again, if uncertain or weary, a good option is to perform a trial cut on a scrap of wood or plastic and do a test fit with the bulkhead.
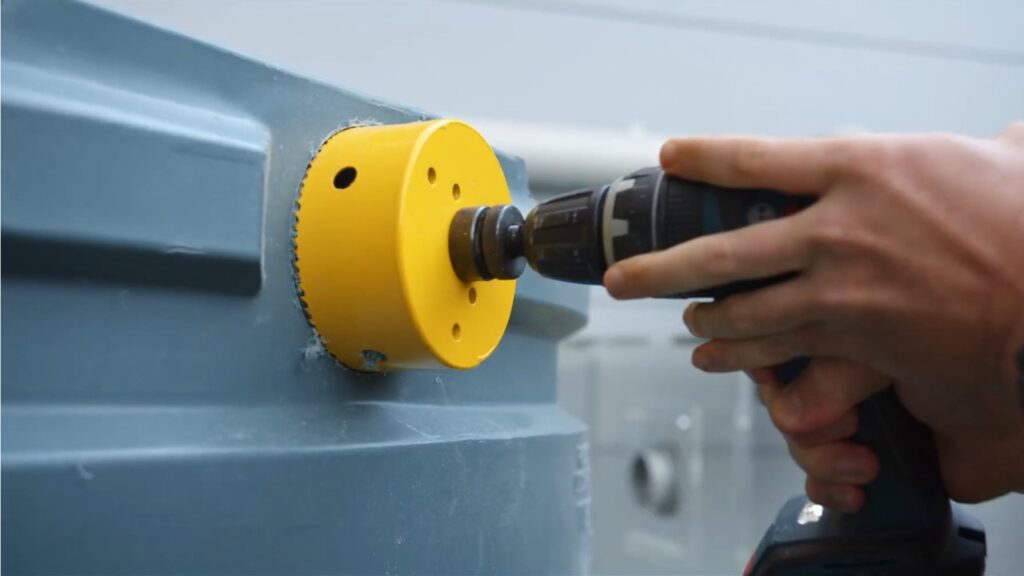
After the cut, ensure your bulkhead fitting inserts properly. The fitting body should slide into the hole and have limited open space around the threads. Cleaning up around the edges of the cut and smoothing out with sandpaper is recommended.
Bolted Bulkhead Fittings
Bolted bulkhead fittings require a hole to be cut in the poly tank but the size will differ from a standard bulkhead fitting. A hole saw is recommended for making this cut. Bolted bulkheads should also have pilot holes drilled for the bolts used to set and secure the fitting. Bolt pilot holes should be cut with a power drill and drill bit.
The required hole size to cut for bolted bulkheads will also differ between polypropylene and stainless steel fittings. Refer to the following tables for recommended hole sizes for bolted bulkhead installation.
| Polypropylene Bolted Bulkhead Size | Hole Size | Bolt Amount | Bolt Hole Size |
|---|---|---|---|
| 3/4 | 1 | 4 | 11/32 |
| 1 | 1-3/8 | 4 | 11/32 |
| 1-1/2 | 1-3/4 | 4 | 13/32 |
| 2 | 2-1/4 | 4 | 13/32 |
| 3 | 3-1/4 | 6 | 13/32 |
| Stainless Steel Bolted Bulkhead Size | Hole Size | Bolt Amount | Bolt Hole Size |
|---|---|---|---|
| 3/4 | 1-3/8 | 4 | 11/32 |
| 1 | 1-5/8 | 4 | 11/32 |
| 1-1/4 | 2 | 4 | 13/32 |
| 1-1/2 | 2-1/4 | 4 | 13/32 |
| 2 | 2-3/4 | 4 | 13/32 |
| 3 | 3-7/8 | 6 | 13/32 |
| 4 | 5 | 8 | 13/32 |
Step Three: Set the Fitting
To set the fitting, it must be inserted through the newly cut hole from the inside of the tank so the gasket and fitting body (the flat, solid end) are on the inside. The bulkhead fitting must be placed into the hole so the locknut and thread side is available on the tank exterior so plumbing connections can be made.
Sometimes tank access can make it difficult to insert fittings from the tank interior. Often, this is due to a small manway size and/or an installation location that’s out of arm’s reach from the tank opening.
In these cases, use a weighted string, feed it through the tank manway or lid and thread it through the newly cut hole, then guide the fitting along the string and into position.
This part of the process may be easier if done with another person who can perhaps grab the weighted string using a pole, hook, or other means and help thread it through the newly cut hole. The same procedure is recommended for bolted bulkhead fittings. Note that this is the most difficult part of the fitting installation process.
Step Four: Set the Locknut or Bolts
With the fitting in place and threaded side out, use the locknut that comes with the fitting and tighten it to set the bulkhead. It is the locknut that keeps the bulkhead in place. Locknuts install on the outside of the water tank. Install a locknut by placing it on the threads and turn-tighten by hand.
When tightening, do not use any tools as it’s important not to overtighten the fitting. Doing so can damage the gasket, fitting, or even the tank wall. When a locknut starts to feel secure and resist further movement, perform another quarter turn to one-half turn. This should be all that’s needed to secure the fitting without leaking.
Thread tape is not recommended for locknuts during fitting installation. Thread tape is recommended however when connecting valves or plumbing to the bulkhead fitting after installed.
On bolted style fittings, align the fitting body with the bolt pilot holes, add the face plate, then add and hand-tighten the bolts to secure the fitting in place. Now, the four lock bolts need to be completely tightened to secure the tank fitting seal. It’s best if they are tightened in a crisscross pattern. Make sure not to overtighten as it can place strain and bulge the gasket which can lead to a leak.
Step Five: Check Seal
The final step in fitting installation is to check the seal. Perform a water test prior to making any extended plumbing connections to guarantee your new bulkhead does not leak. To do so, fill the tank up to fitting level and check for water coming from around the seal. If a leak develops, loosen the locknut just enough to rotate the entire bulkhead in a clockwise turn then retighten the locknut. If a leak develops on a bolted bulkhead, check the tightness of the bolts.
Takeaways | Fitting Installation on Poly Water Tanks
Installing new fittings on a polyethylene water tank can be a fairly straightforward job. The process is one best performed in a stepwise manner and must be performed correctly as it can mean the difference between a fitting that leaks your valuable stored resource or one that is sealed to last.
Five steps, basic woodworking tools and the proper procedure is usually all that’s needed to place a new bulkhead fitting on a poly water tank. If you have any questions or comments, never hesitate to reach out to us.