In this Poly Tanks Series post, we will outline where water tanks can be connected, where they are often made to be connected, how to connect tanks together, and the various benefits of the different connection methods. First, to join two or more water tanks together, you will need the tanks to join, the piping to connect them, and you may need an additional fitting or fittings for some tanks.
Reasons to Join Water Tanks Together
Joining two or more water tanks together is a common practice used to increase the total stored water volume available for use at a location, business property such as a farm, or at a home. The practice is also done for certain water handling and distribution systems, often to set different tanks for different tasks, such as sediment tanks and purification tanks. Joining tanks together is sometimes done to add onto or expand an already existing water tank system. When connecting water tanks, any number of containers can be joined together in sequence in a one-by-one style installation.
The recommendations written here can be used to connect many types of storage containers, not just those for water. The examples in this guide are mostly for larger volume, vertical type plastic water tanks but the same principles and methods will also work for other types of containers commonly used for storing water, rain, chemicals, and other materials. Guidelines in this article can be used to join together rain barrels, rainwater harvesting tanks, leg tanks, underground cisterns, and IBC totes, to name a few.
Where Can Water Tanks Be Connected
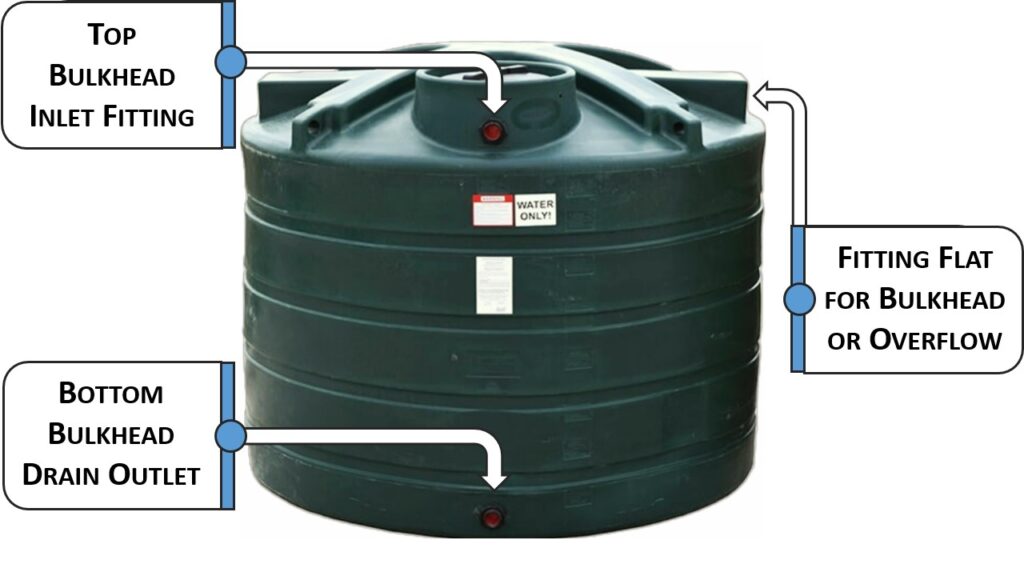
There are three (3) locations on a water storage tank that can be used to join multiple tanks together. The three locations used to connect water tanks are:
- At the top of a tank, at a bulkhead inlet or an overflow port.
- At the bottom of a tank, at the bulkhead outlet or drain valve.
- At an additional bulkhead or fitting installed at any one of the tank’s available fitting flat locations.
- At the top of a tank, at a bulkhead inlet or an overflow port.
- At the bottom of a tank, at the bulkhead outlet or drain valve.
- At an additional bulkhead or fitting installed at any one of the tank’s available fitting flat locations.
How to Connect Water Tanks at the Top
Connecting water tanks at the top of a tank is often done at an added bulkhead fitting or an overflow port. Many types of water tanks, especially rainwater tanks, feature a pre-plumbed bulkhead fitting towards the top of the tank near the manway or lid. This bulkhead fitting is often used either as an inlet or for the tank overflow. An overflow provides a means to discard excess water when the storage tank is full and a means to direct the water away from the tank such as to a storm drain or garden.
Most top inlet fittings are 1 inch to 3 inches in size while overflow ports are often 3 inches or 4 inches in size. The larger sizes are perfect as they are commonly used for water distribution plumbing, especially in personal systems and rainwater harvesting. Many bulkheads are NPT style threaded fittings while overflow kits feature bell-shaped PVC ends. Both cases make for easy installation with PVC plumbing.
To join tanks together at the top, start by positioning the tanks where they will be installed. If this is next to each other, keep a space between the tanks so they are not touching. At least six to twelve inches is recommended for this. Rotate tanks where the fittings or overflow ports are directed towards each other. Measure and record the distance from tank to tank with enough length to make a secure connection. Cut a piece of PVC pipe that is of the correct width to the correct length and install the pipe. Use of ANSI/NSF 61 and ANSI/NSF 14 certified PVC pipe is recommended, even if the application will not be for potable water.
If the tanks will be at some distance to each other, consider sketching a diagram of proposed tank locations, the projected piping run needed to connect the tanks, and any obstacles or other considerations associated with the property or landscape. This will help determine the feasibility of the activity as well as how much PVC plumbing is needed.
When connecting tanks at the top, it is best to install the tanks as close to each other as possible. System simplicity, efficiency, and reliability are the main reasons why. When connecting tanks that are at a distance, extra considerations for the height of the first tank, turns and angles in the piping run, slope and maintaining adequate water flow all come into play and make installation more complicated, time-consuming, and problem-prone.
Considerations for Top-Connected Tanks
Joining two or more tanks together at the top will make tanks fill up in a one-by-one sequence. In top-connected tanks, the first tank to receive water will have to fill to the point where the tanks are connected before any water will flow to the next tank in the connection system. Then the second tank will follow this pattern until the container is full. When the second tank is full, it should then use an overflow to discard excess water or distribute it to a third tank for filling. For top-connected tanks, this will likely mean a new fitting or overflow port kit will need to be installed on the last tank in the connection line.
Also, to fill the first tank in a closed system style at the top, an additional bulkhead fitting will have to be installed. Without this additional fitting, the inlet options for the first tank in a top-connected system becomes the manway / lid or the bottom drain outlet. If the bottom drain outlet is used, then another outlet will be needed to tap this specific tank.
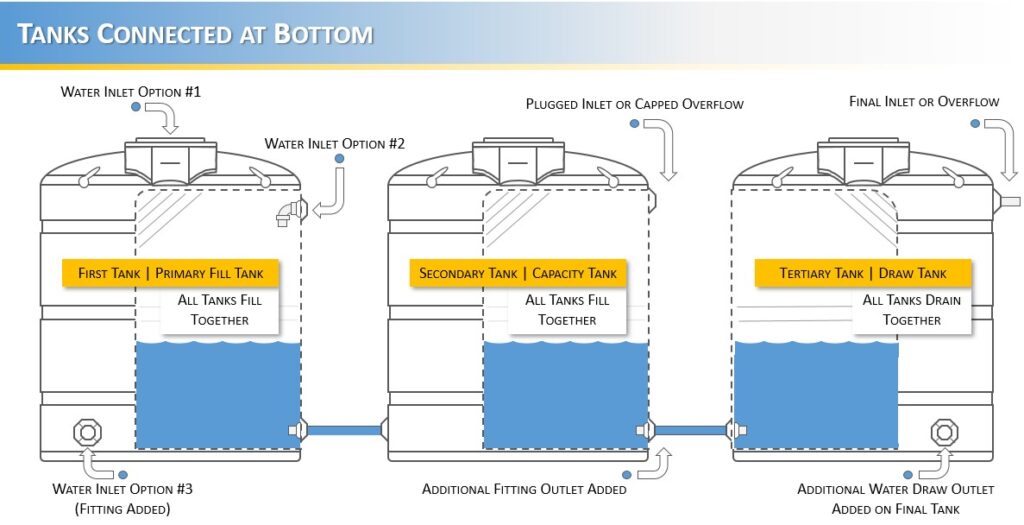
See the infographic below for a visual example of three water tanks joined at the top at an inlet fitting or overflow port.

Due to gravity and air pressure and their effect on water, the maximum water level for all tanks in a top-connected system will be limited to the height of the outlet port on the first tank. Due to this, the best practice for connected tanks is to place the first tank at the highest land level location. This helps to maximize the water volume in the following tanks and helps improve water flow. Note that this is not necessary though.
Drawing from Top-Connected Tanks
Tapping the water means to draw water from the tank at a spigot or distributing water through plumbing often with a pump. When tapping water from a top-connected tank system setup, water will only be drawn from the individual tank being tapped. This means the water collected and stored will only release from the one tank and any water in the other tanks will remain unchanged for use when needed.
Top-connected tanks can be set up so water can be drawn from all tanks in the system when tapped. One method to draw from all tanks collectively and keep water levels the same is to use piping to connect all tanks together at their outlet taps then link this to a solitary outlet valve. When this single outlet valve is used, all connected tanks will be tapped together.
Benefits of Joining Tanks at the Top
The largest benefit gained from connecting tanks at the top is an increase in the overall total capacity and liquid volume available for use. Joining storage tanks at the top will provide the ability to increase the storage capability of your system with individual containers that can be positioned freely wherever they fit best, and therefore eliminate the need for large volume containers that take up significant land area.
Top-connected storage tanks also allow for independent draining and drawing from individual tanks. Water in top-connected tanks will only release and flow from the tank being tapped while the water level in the other tanks will remain at their current level and remain unaffected as the one tank has water drawn from it. This can allow tanks to be used for separate tasks or plumbed together for use in a single system such as irrigation. This also allows the owner to better manage and monitor water levels and how much water is being used.
The unique drainage style of top-connected tanks also allows for keeping a set tank as an emergency reserve supply tank, to serve as a backup when water levels are low and other supplies may be limited or restricted such as during a drought.
How to Connect Water Tanks at the Bottom
Connecting water tanks at the bottom is often done at the tank outlet, sometimes also called a discharge port or drain port. Most water tanks are pre-plumbed and fitted with a single bulkhead fitting type outlet port that can be used to connect multiple tanks together. Water tank outlets range in size but are often a 1 inch or 2 inch NPT style bulkhead fitting. Some water tanks are pre-plumbed with two (2) outlet drain ports. This is common in rainwater harvesting tanks. Tank outlets are sometimes equipped with a valve or a plug. This may have to be removed and/or modified to allow connection to PVC plumbing for joining tanks together.
To connect water tanks at the bottom, position the tanks where they will be installed. Closer is oftentimes better. Ensure at least six to twelve inches of spacing between the tanks. Then measure and record the length between the outlet ports. Know the width measurement of the tank’s outlet port and its style. Female NPT type ports are common on plastic water tanks and can be directly threaded to with male NPT style plumbing and connector fittings. Next, measure a PVC pipe of correct width and cut to the correct length. PVC pipe that is ANSI/NSF 61 and ANSI/NSF 14 certified and labeled is recommended.
See the infographic below for a visual example of three water storage tanks connected at their bottom outlet ports.
Considerations for Bottom-Connected Tanks
Water storage tank outlets are often only 1 inch or 2 inches in size, making for a smaller plumbing connection and pipe. This could be problematic due to the thin size of the pipe and the outlet’s location near the bottom of the tank. These factors can increase the possibility of sediment or debris to build up and cause blockage, which would then need to be cleaned. An optional recommendation would be to replace the smaller diameter bulkhead fitting with a larger one to allow for larger diameter plumbing to be installed.
As bottom-connected water tanks utilize the drain outlet, (or another installed fitting), tanks in this system style do not need additional bulkheads or overflow port kits installed except on the last tank connected in the series. All other ports are recommended to be capped or plugged to keep the storage tank closed and secure.
Drawing from Bottom-Connected Tanks
When tapping and drawing water from a bottom-connected tank system setup, water will be drawn from all connected tanks at the same time. This means the water collected and stored will release from all tanks together and fairly evenly with the water level between tanks balancing itself out to maintain a steady, equal volume.
Bottom-connected tanks do not need to be set up so water can be drawn from all tanks in the system when tapped. Due to the bottom location of the tank’s connections, gravity, and water pressure, when one tank in this system is tapped and drawn from, all tanks are in effect drawn from.
Benefits of Joining Tanks at the Bottom
Joining two or more tanks at the bottom will cause all connected tanks to fill up and drain almost evenly. When the first tank in the system fills with water up to the point of the connection plumbing leading to the second tank, the first tank will not fill anymore until the second tank reaches the same water level as the first tank. If there is a third tank, or more, then this will happen until all tanks in the system have filled to the same water level. When the tanks all have equal water volume, then as water flows in, the water level in all tanks will increase, and as water flows out, the water level in all tanks will decrease. In both cases, this happens more or less evenly and will depend on how fast water is being added to the tank and the size of plumbing used.
A large benefit for a system of bottom-connected tanks is that they will only need one tap and one overflow port, if necessary. Usually, both features are installed on the tank that is the lowest in the system, lowest meaning last or lowest in height by gravity. When water is drawn from one tank, the water in all tanks will balance out until the entire system has equal volume again. This works in favor of the tank system’s overflow and when tapping the water tanks. This happens due to gravity, atmospheric pressure, and the pressure caused by the water in the tank since the tanks are connected at the bottom.
Bottom connected tanks will only require one overflow and one outlet tap for the entire system. More than one can be used, but only one is required for functionality.
How to Connect Tanks at Different Locations | Where to Place New Fittings
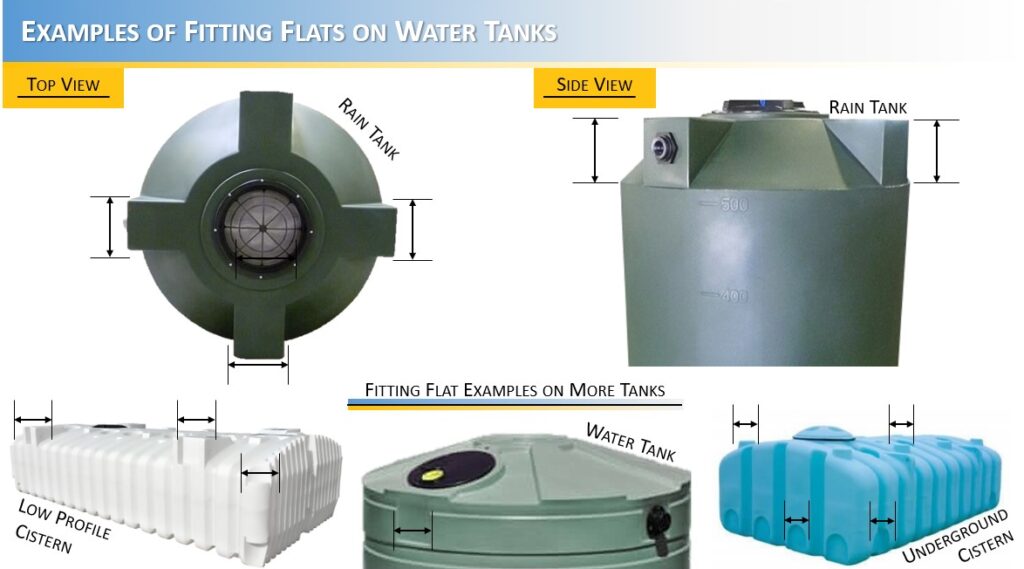
Most plastic storage tanks have what are called “fitting flats” built into the engineering design of finished, plastic molded tank products. These fitting flats are flat, level locations often intentionally added to a storage tank to provide a location for the installation of additional fittings, such as bulkheads, which can allow extra plumbing connections to be made to the tank. Additional fittings are in addition to the one, (often two), fitting connection ports that come standard on most containers.
Fitting flats are often located toward the top of the tank. Flats are sometimes located along the tank sidewalls, including at the bottom. In both cases, they are usually at a distance 90° to each other, sometimes 45°, on most vertical poly tanks. Technical drawing sheets for individual water tanks can be helpful in locating designated fitting flat locations if they are not apparent in the tank’s design. Many online suppliers of plastic water tanks also provide technical drawing sheets for the products they are selling.
See the following infographic for examples of fitting flats and locations on various water tanks.
How to Install New Fittings
Most often, bulkhead fittings are the tank plumbing fitting type used to add valves or make plumbing connections to poly tanks. Sometimes purchasing new bulkhead fittings will include a specific instruction guide to follow for installing the new bulkhead. Installing a new bulkhead fitting is a simple process with only a few steps.
- Drain tank.
- Mark install location.
- Determine hole size needed (often manufacturer provided).
- Use drill and plastic-approved hole saw bit to make hole.
- Smooth and clean out hole.
- Disassemble bulkhead, place new bulkhead fitting in hole, and reassemble.
- Hand tighten bulkhead locknut.
- Use a manual wrench to tighten an extra ½ turn.
For more information, see our post on how to install fittings on a water tank.
Filling Connected Tanks with Water
There are at least four options available for filling connected tanks with water or another material for storage. The first three are the most common and easiest as they make use of features or plumbing connections that are already present on the container. These options are:
1. Fill containers from the manway, lid, or top opening
Using the lid or other container access on top is a common method, especially in rainwater harvesting for filling rain barrels and cisterns. This option leaves all other fittings and outlet ports free for other use.
2. Fill containers from the overflow fitting
Converting and using the overflow fitting, if present, to accept incoming water flow is more common in connected tank systems. This option provides a closed style system for water filling but will have to have an additional port added to serve as an overflow if needed. Another option is to purchase a container that is pre-plumbed with an extra port.
3. Fill containers from the bottom outlet valve
Using the bottom outlet valve to fill water tanks is not frequently used except in scenarios with multiple tanks connected together or with tanks that have a pump and plumbing that draws water from the top. This option maintains a closed system and allows the top fitting or overflow port to be used to connect extra tanks or as an overflow.
4. Fill containers from an additional bulkhead or fitting
Using an additional bulkhead or fitting is less common as it requires installing another plumbing port on a container that doesn’t already have one but is often necessary. Buying a tank pre-plumbed with extra fittings can be an effective choice to serve this water filling option.
Takeaway | How to Connect Two Water Tanks Together
Connecting two or more water tanks together can be a fairly simple procedure and one that allows for easy upgrading or adding on to an existing water storage system. Water tanks can be connected by fittings and plumbing, most often at the top or bottom. Each location provides their own set of benefits. Connecting multiple containers together will increase how much water can be stored for use and make a single water distribution system. For more information or if you need help in finding the right water container for your application, contact us.