- Description
-
Details
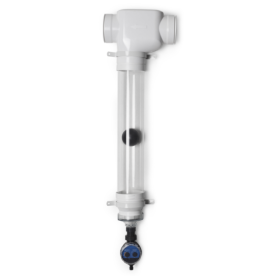
Rain Harvesting Downpipe First Flush Water Diverter, part# WDDP111 improves water quality and reduces tank/cistern maintenance by preventing the first flush of water, which may contain roof contaminants, from entering the tank/cistern. First Flush Diverters help ensure cleaner water is available for use, which protects rainwater pumps and internal household appliances such as clothes washing machines, toilets, hot water systems, etc.
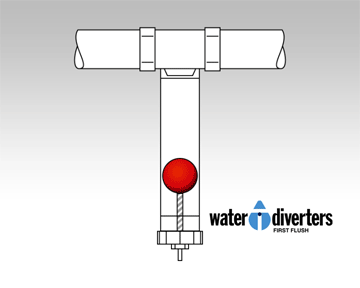
Downspout First Flush Diverters, such as the 3" and 4" kits, are installed at each downspout that supplies water to the tank/cistern. These First Flush Water Diverter Kits utilize a dependable ball and seat system - a simple automatic system that does not rely on mechanical parts or manual intervention. As the water level rises in the diverter chamber, the ball floats, and once the chamber is full, the ball rests on a seat inside the diverter chamber preventing any further water entering the diverter. The subsequent flow of water is then automatically directed along the pipe system to the tank/cistern.How do they work?
Fitting an appropriately sized First Flush Water Diverter is critical to achieve good quality water. Water Diverters improve water quality, reduce tank/cistern maintenance and protect pumps by preventing the first flush of water, which may contain contaminants from the roof, from entering the tank/cistern.
When it rains, water slowly builds up in the roof guttering system before it exits through the downspout. The first flush of water from the roof can contain amounts of bacteria from decomposed insects, skinks, bird and animal droppings and concentrated tannic acid. It may also contain sediments, water borne heavy metals and chemical residues, all of which are undesirable elements to have in a water storage system.

Instead of flowing to the water tank/cistern, these pollutants are diverted with the initial flow of water into the chamber of the water diverter. The water diverters from Rain Harvesting utilise a dependable ball and seat system – a simple automatic system that does not rely on mechanical parts or manual intervention.
As the water level rises in the diverter chamber the ball floats, and once the chamber is full, the ball rests on a seat inside the diverter chamber preventing any further water entering the diverter. The subsequent flow of water is then automatically directed along the pipe system to the tank/cistern.
For a water diverter to work effectively, the contaminated water in the chamber must be sealed off. This prevents the water passing to the storage tank/cistern and ensure the water does not “syphon” off the contaminated water in the chamber. The simplest and surest way to do this is with a floating ball and seat.
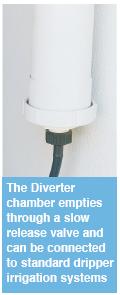
A slow release valve ensures the chamber empties itself after rain and resets automatically. The diverted water need not be wasted water because the drain pipe from the diverter chamber can be fitted to a standard drip irrigation system.
How much water to divert
It is important to prevent heavy sediments and other roof pollutants from entering the rainwater tank/cistern. The amount of water diverted should be a minimum of 12.5 gallons per 1000 square feet of roof area (or 0.0125 gallons per square foot). In calculating the amount of water to divert, consideration can be given to (1) the surface area of the roof, and (2) the amount of pollutants on the roof and gutters.
The following factors can be used as a guide in determining the volume of water to be diverted.
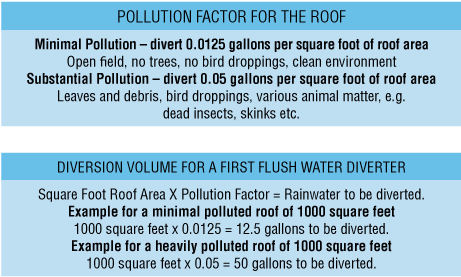
As a rule of thumb, the more water that is diverted the better the quality of water in the tank/cistern.
Installation Instructions
1. Determine the length of Diverter Chamber #4. Consider as a guide that each:
– 3 foot section of 3″ Schedule 40 PVC pipe holds approx. 1.5 gallons of water.
– 3 foot section of 4″ Schedule 40 PVC pipe holds approx. 2 gallons of water.
Fit the longest length of pipe possible, making sure the Screw Cap #10 is at least 6″ from the ground to allow for removal and cleaning.
2. Place the ball Seat #9 into the Tee Junction #6 ensuring the narrow end of the ball seat points down into the Diverter Chamber #4. Apply glue to the Diverter Chamber #4 and fit up against the Ball Seat #9 and hold until the glue sets. (Optional: Use a 45° bend adaptor to allow easier removal of the Screw Cap #10). Glue the Socket #14 to the bottom end of the Diverter Chamber #4.
3. Fix the assembled chamber directly to the wall in the desired position
using the Wall Brackets.
4. Connect a Male & Female (M&F) Elbow #8b (if required) to the Chamber Outlet #8 and connect the downspout #3. Fit an elbow to the InFeed pipe #2 (if required) and connect to the bottom of the selected rain head.
5. Select the appropriate Flow Control Valve #11 and insert into the Hose Connector #16, making sure the valve is inserted with the side marked “TOP” still showing. Start by using the Control Washer with the smallest gauge hole (lowest number). Try a larger gauge Washer if experiencing blockages. Place the Filter Screen #13 into position from the outside of the Screw Cap #10 and then attach the Hose Connector #16.
An extra filter screen that helps stop the Control Valve blocking is available from your local store. Ask for the “Optional Stainless Steel Primary Screen” (Product Code: WDAC02). This filter is fitted in addition to the Plastic Filter Screen #13. To install: After completing step 5, insert the Keeper Ring #1a into the Screen Cap #10 and then place the Optional Stainless Steel Primary Screen on top of the Keeper Ring #1a. Proceed to step 6.
6. Place the Sealing Ball #5 into the Diverter Chamber #4 and attach the
assembled Screw Cap #10 to the Socket #14.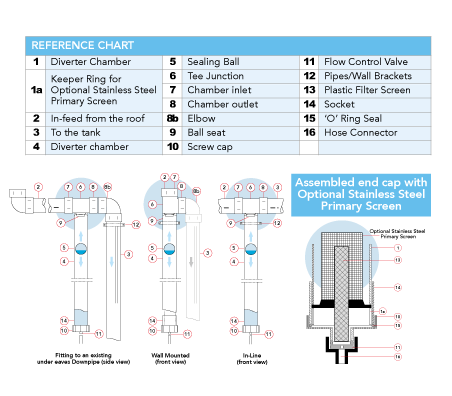
- Specifications
-
Additional Information
Store ID X6995241 Manufacturer Info Product Part # WDDP111 Manufacturer Rain Harvesting Shipping Weight (lbs) 4.3000 Installation Instructions Rain Harvesting WDDP111 Installation Instructions Physical Features Weight (lbs) 4 Color Natural White Product Type Rainwater Diverter Shipping Info Shipping Locations Texas Shipping Zip Codes 77084 Liftgate Option Yes